'We do not remember days, we remember moments'. (unknown)
In our lifetimes, we encounter a lot of things- we go places, meet new people, do new things, have new experiences. The emotions, those experiences, and how we perceive them all become that precious thing we call memories. What do we do with those memories, or moments? What makes them important to us? And, how do we remember them? Why do we remember them? What happens to those memories after we are gone?
That's a scary thought, isn't it? When our children, or our childrens' children are looking through photos we took during our lifetime, are they going to know who the people are in the photos, or the story behind why the photo was taken? Are they even going to know who we are? Will there even be photos for them to browse through in 50 or 100 years?
There are a multitude of reasons why a person scrapbooks, and the answers from individual to individual is different. We all have different reasons for wanting to scrapbook. Some of us just enjoy the creative outlet it affords us; some of us want to preserve family heritage and genealogy; and others want to record the special events in their lives. Whatever our reasons for wanting to scrapbook, the bottom line is that we all want to preserve some part of our lives for future generations.
We do that so they know who their family is/was, what they were like, the things they struggled with and/or enjoyed; and, we do it so that we can learn. Through the scrapbooking process, we learn about ourselves (sometimes). But, most importantly, its our children or whoever we are making an album for, that will eventually learn and benefit from our efforts.
This is how I interpret why a person wants to scrapbook. If you look online, you'll find numerous reasons why a person scrapbooks- and like I said, the answer is going to differ between each site/person you research. Why do I scrapbook? I want my children to have a deeper knowledge and better understanding of their parents- especially me- when they are old enough to understand, and start asking why their mom or dad are the way they are. I want them to know what made me laugh, what made me sad, the personal struggles I endured, how much I love them and how proud of them I am. I want them to be able to experience things they don't remember- their births, their early years, the struggles of raising children (and the blessing), as well. I want them to be able to celebrate, over and over, various special occasions- with just the four of us, and with the extended family, as well. This is also part of the reason I blog. But, the only 'blogging' they're ever going to see, is the visual one that I am making for them.
I also scrapbook because I enjoy the creative freedom it allows me. I feel so much self-satisfaction seeing a memory I have being put down on paper- through color, pictures, journalling and pretty paper. Its been said (and I do believe its true), that scrapbooking is cheaper than therapy. Its a great way to let the day drain from you; all that energy is being taken and used in a positive and healthy way. I've heard it keeps a lot of moms sane. I am one of them. There you go--living proof!! LOL
After talking with a couple of different friends over the recent past, I began thinking that looking more in depth into the scrapbooking hobby might be beneficial for my readers- especially if you're not a scrapbooker, or are fairly new to the hobby. I want to be able to help build your confidence as a paper crafter by showing you what you'll need to begin scrapbooking, where to start in your creative endeavour, and tips for making the process easier and not so overwhelming. As a basic guideline, I'll be loosely following Scrapbook.com's scrapbook university- 24 lessons to help the beginner scrapbooker get started. If you're interested in more, or want to take the scrapbook class, you'll find the link here. Each lesson will be delivered to your email box on a daily basis, and members at scrapbook.com will get it for free. There's no better deal than that! Their program was created by the founder of scrapbook.com, Jill Davis, and a team of expert scrapbookers. So, if you're looking for the best advice and info you can get, I would recommend heading to their site! If you just want a more personal approach from a tried-and-true-fellow scrapbooker, then look no further than here!
Every week, on Thursday (since today is Thursday), I'll be sharing another topic with you. I invite you to share your feedback, any thoughts and concerns you have. Lets make this interactive and a learning experience for all of us! I think that would be great! Next week, I'll be sharing the basic tools you'll need to begin scrapbooking. Looking forward to seeing you here!
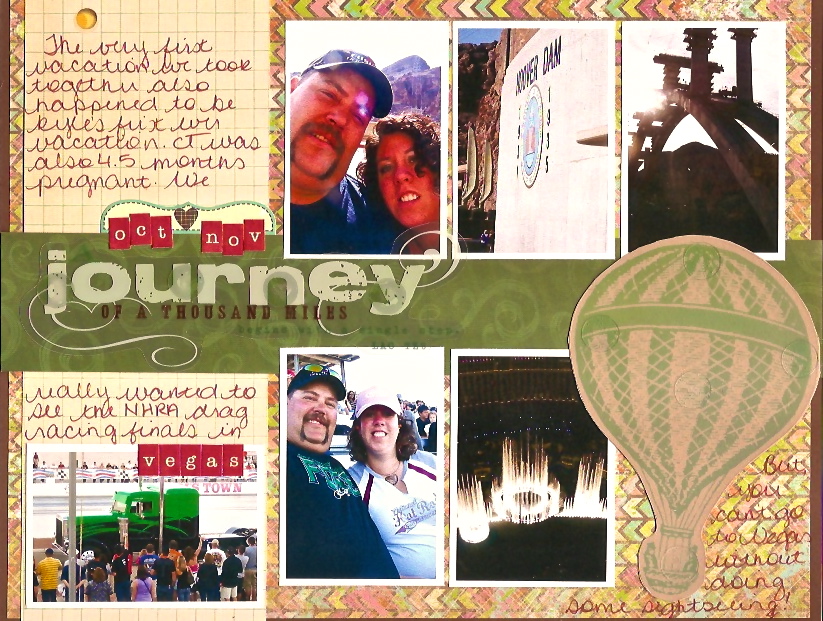
And, in other news, I just quickly want to share with you the layout I finished last night. I have another one completed (haha), but its going to have to wait until tomorrow. Also, I will have a mini-tutorial to share with you, as part of that blog post. Eek! I'm pretty excited about sharing it with you!
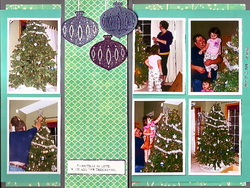
I mentioned (in error), that this layout marks a pre-cursor to my next series, which will be all about Christmas; but as I look through my journal, I see that I didn't do much recording through November and December. Soooo, that means that my Christmas series has, in fact, begun; there will be a few layouts mixed in there just for some variety. This layout marks the end of November, and the next one I'll show you (tomorrow), marks the beginning of December.
I had so.much.fun putting this layout together. As always, I sat and pushed the paper around, trying to find a good vibe for the layout I wanted to create, when it suddenly hit me. I was thinking of the layout I made that's coincidentally the header of my Facebook page, and wanted to make something similar. Instead of making the paper strip horizontal, like in that other layout (I'll include a picture at the end of the post), why not make it vertical. And, why not make a separation between the pictures?! Novel idea. I was smitten. I stamped a few ornaments, 'fussy cut' them out (which is a fancy scrappy term meaning I cut them out), stuck them to the page, and added a sentiment, which doubles as the title, and my layout was done. Very, very simple, but packs a huge wallop. I like that there's negative space between the ornaments and the sentiment. The rest of my layout is pretty busy, so it gives the eye a place to rest. Also, its hard to see, but on the upper right side of my layout, I used a date stamp to stamp the date. You can find these at Walmart (they're $10); they're part of K&Company's Smash collection.
Wondering how I made the ornaments? I used embroidery thread to mimic the hooks that Christmas ornaments hang from the tree from. There are a variety of ways to do this: you can stitch them using your sewing machine, or a stitching template; you can doodle dotted lines (I tried this first, but the white gel pen I used didn't show up against the paper, so I had to improvise), or you can use ribbon. Get creative! Use your imagination!
I used glue dots to stick one side of the thread to the front of the page, and another glue dot to stick to the back side of the paper. I also pop dotted the small strip of patterned paper, so to prevent the glue dots from sticking to the paper underneath it, I cut small pieces of scrap paper and stuck them over the glue dots. Once the ornaments were fussy cut, I adhered them over the front side of the embroidery thread 'hook'.
Supplies:
-Stampin' Up: Contempo Christmas stamp set (the ornaments and the sentiment stamp), Whisper White ink, Basic Black ink, Night of Navy ink
-Recollections: 'Cool Water' card stock (grey and blue)
-Jillibean Soup: Winter Tortellini collection (both blue patterned papers)
-Adhesives: Herma Vario tape, 3D- dots foam dots, Glue Dots (which I buy from the Dollar Store)
-Paper Trimmer
-Misc: white embroidery thread
 RSS Feed