Goodnight, sweet dreams, and I'll catch up with everyone again tomorrow!
Hi everybody! Remember me?! How are y'all doing?! Our camping trip was phenomenal. The campground was so.nice- quiet, private, full of families and kids; the lake was gorgeous- clean, sandy, wet; and the area we camped in was just simply stunning. If any of my fans and readers live in the Elk Point/St. Paul/Two Hills/Col.d Lake area, you are incredibly lucky ducks. I've never been to that part of the province, and I've fallen in love with it. I love the hills, the trees, the lakes...just plain gorgeous. I've concluded the Whitney Lakes Provincial Parks is my most favorite place to camp. Thus far. Anyone ever been there? What are your thoughts? 
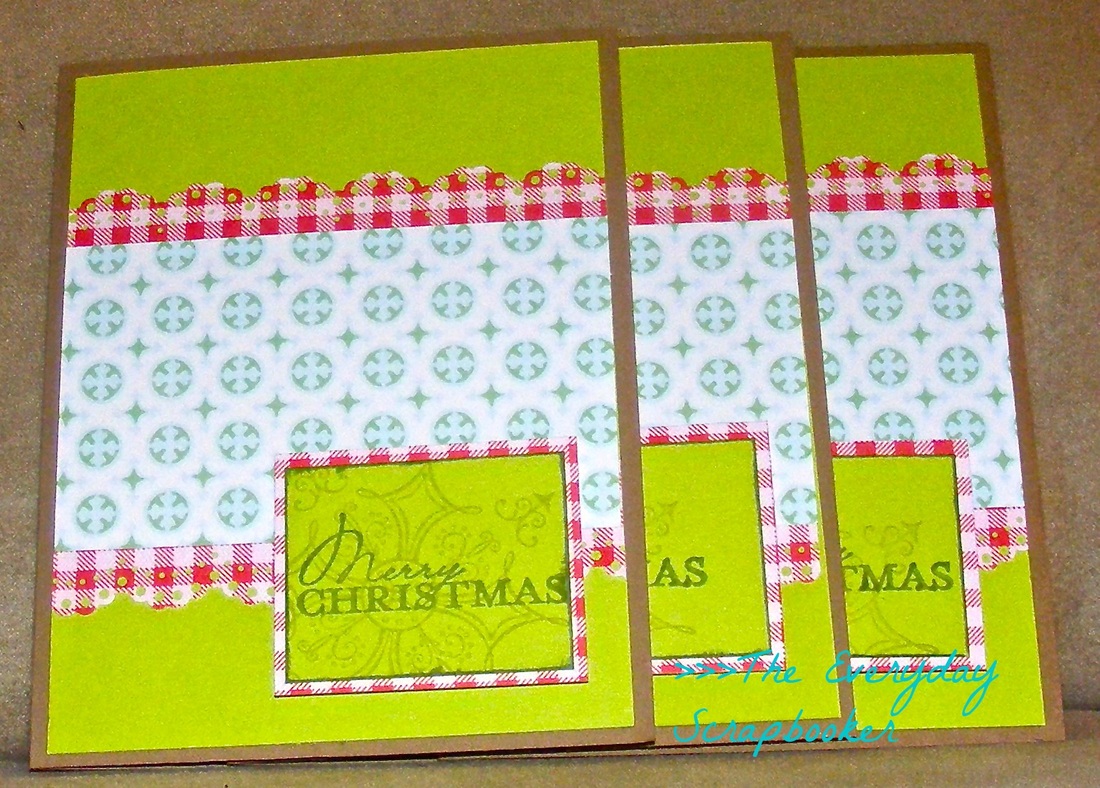
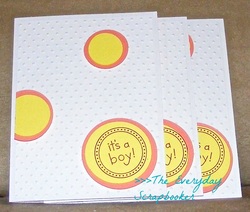
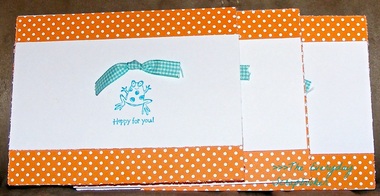
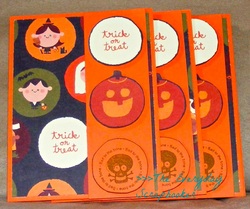
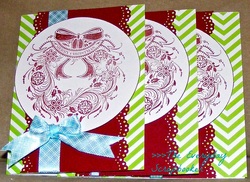
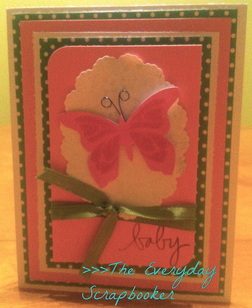
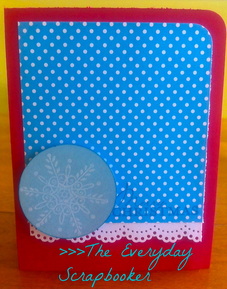
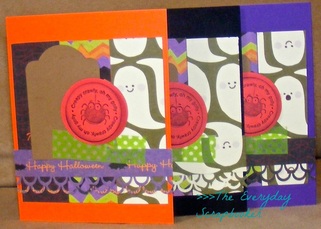
Does anyone remember THESE cards? I know I made them quite some time ago. I had a "Duh!!" moment this afternoon, and posed a question to my group page, asking my fans if they would prefer each set of cards being different from the other, or if I should start replicating each of the sets, using different sentiments. The question is still open- I'd love for your input- but I'm thinking I'm going to start making duplicate sets of all the cards I have now, but variegate the sentiments between them all. I made up a list, which will include all the major holidays (Easter, Christmas, Thanksgiving, Valentines), and the major sentiments most cards implement (baby boy, baby girl, birthday, sympathy, thinking of you, etc). When the other, not so big, but still big in their own way (Halloween, Canada Day, Back to school, etc.) events roll around, I'll have a few OOAK's, or One of a Kinds for sale. That way I can integrate everything! I really need to sit down with a calendar and mark down all the holidays. And, considering my American friends, think of their holidays, too. 
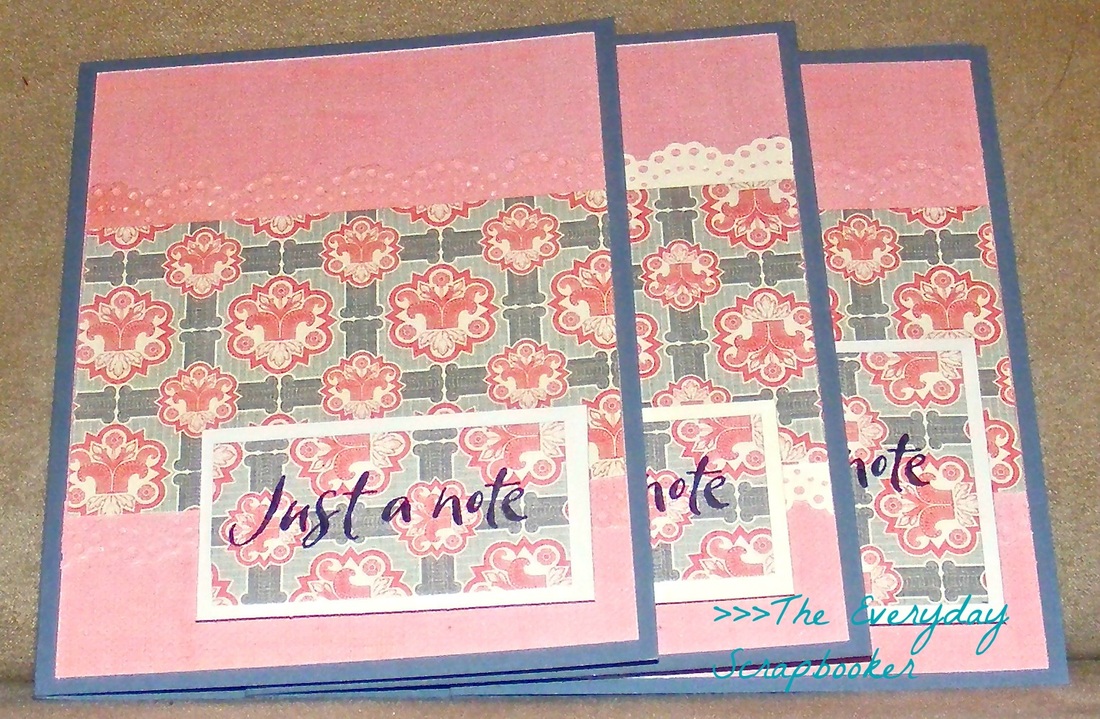
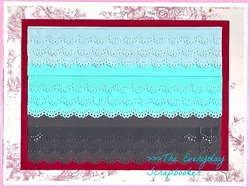
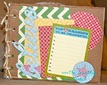
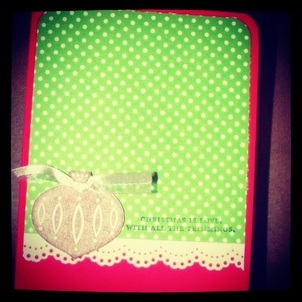
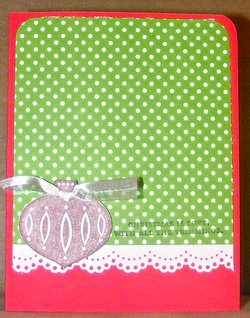
As a result, here are the first two sets in the Doily Scallop collection: 
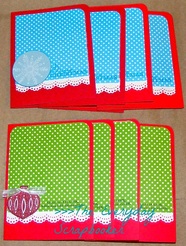
I splurged this afternoon, and bought some new paper packs and other goodies at Walmart, and I used some of the new patterned papers here. The Christmas cards were made using patterned papers from the 4x6 Sweet Nectar Designer Mat paper pad by EKSuccess; the patterned papers in the Just a Note cards are from the Patty Young Designs collection pack by Momenta. I'm absolutely loving that coral paired with the grey! I've got to remember that color palette! 
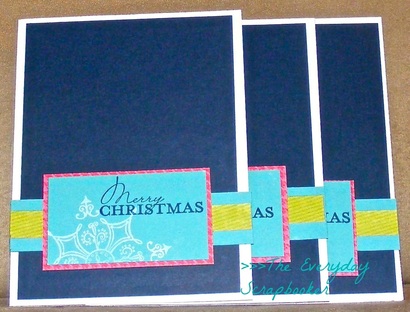
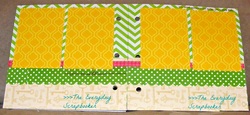
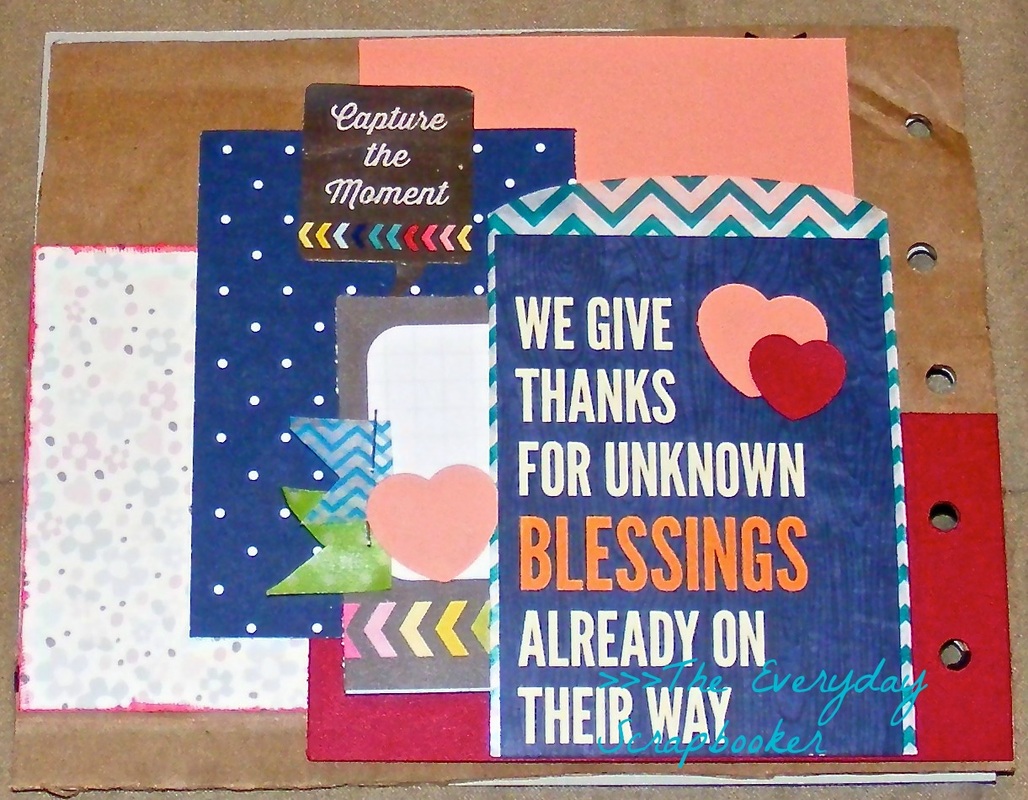
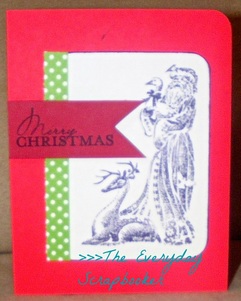
I also made another set of cards today, but its what triggered my decision to start replicating everything. I've reached a point where its gotten to be a bit frustrating to keep looking for inspiration (and not being satisfied or inspired by anything), and so I decided that it was time to switch gears. Come the New Year, I'll search for new inspiration (not that I'll stop collecting it!!); its just that I'll start implementing it in the New Year. So, here's the other set of cards: 
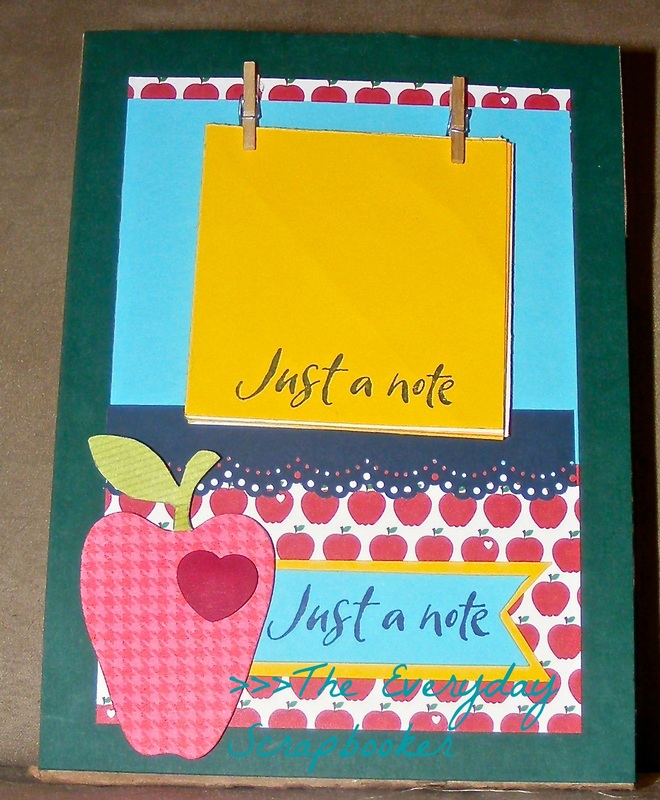
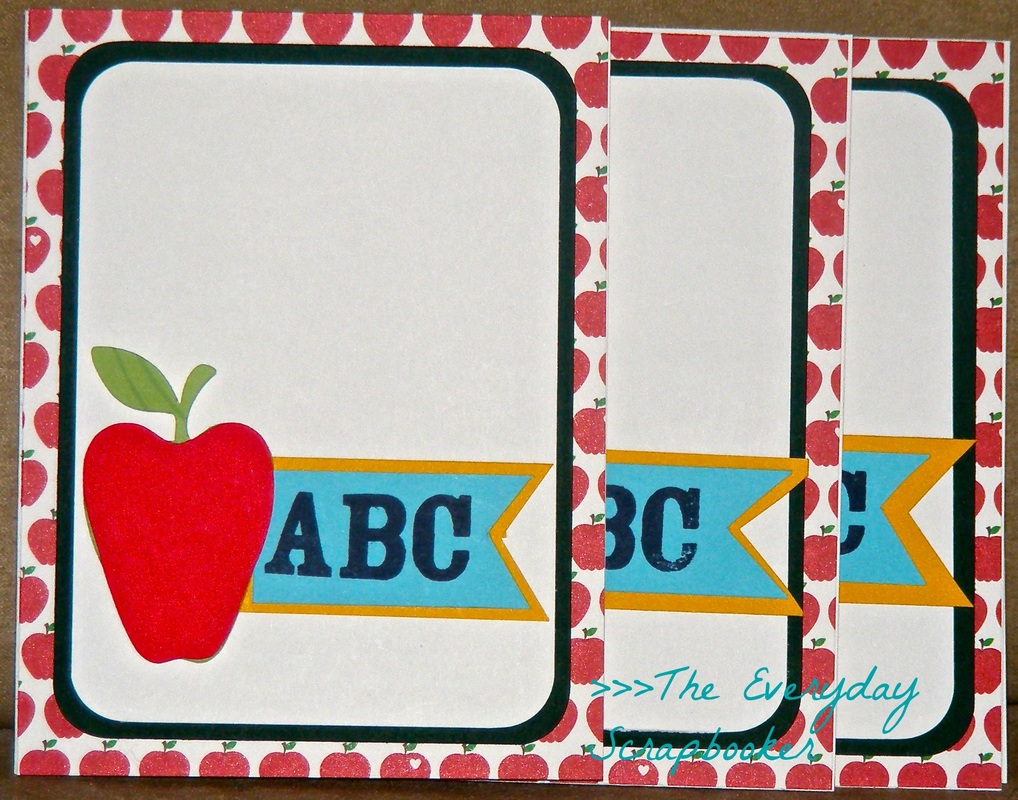
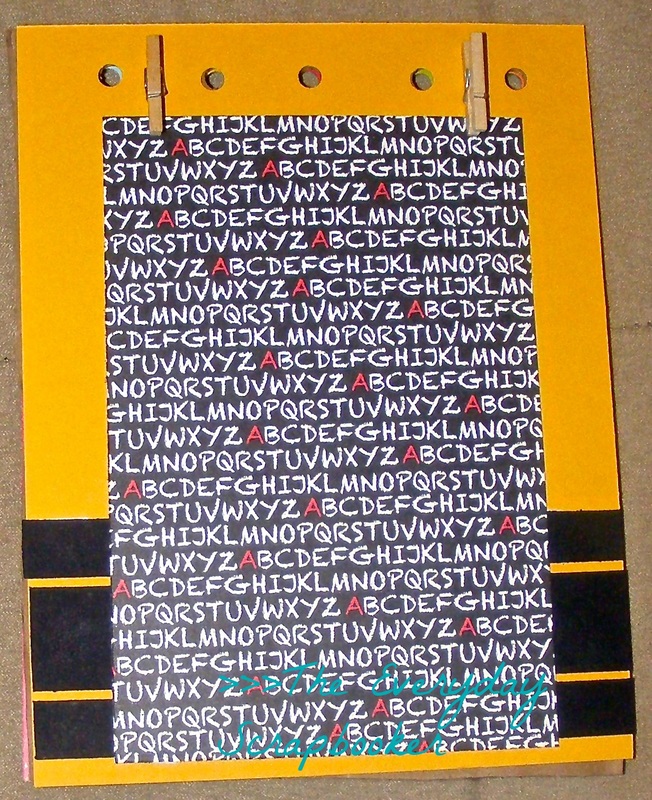
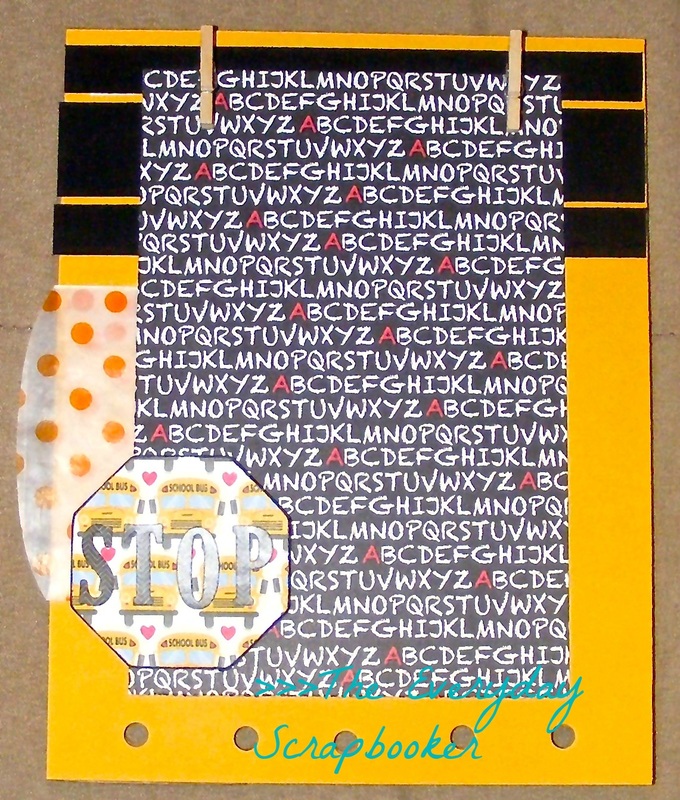
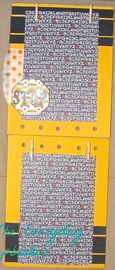
Early this morning, before the day wound up getting crazy and hectic, I completed these two projects: 
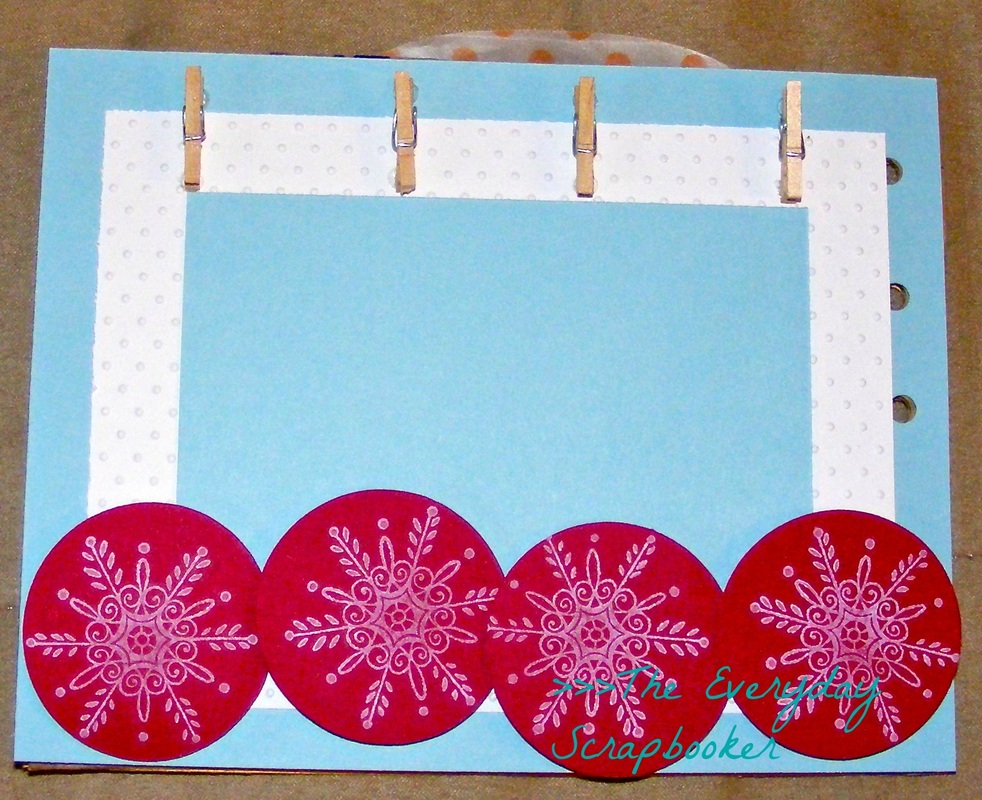
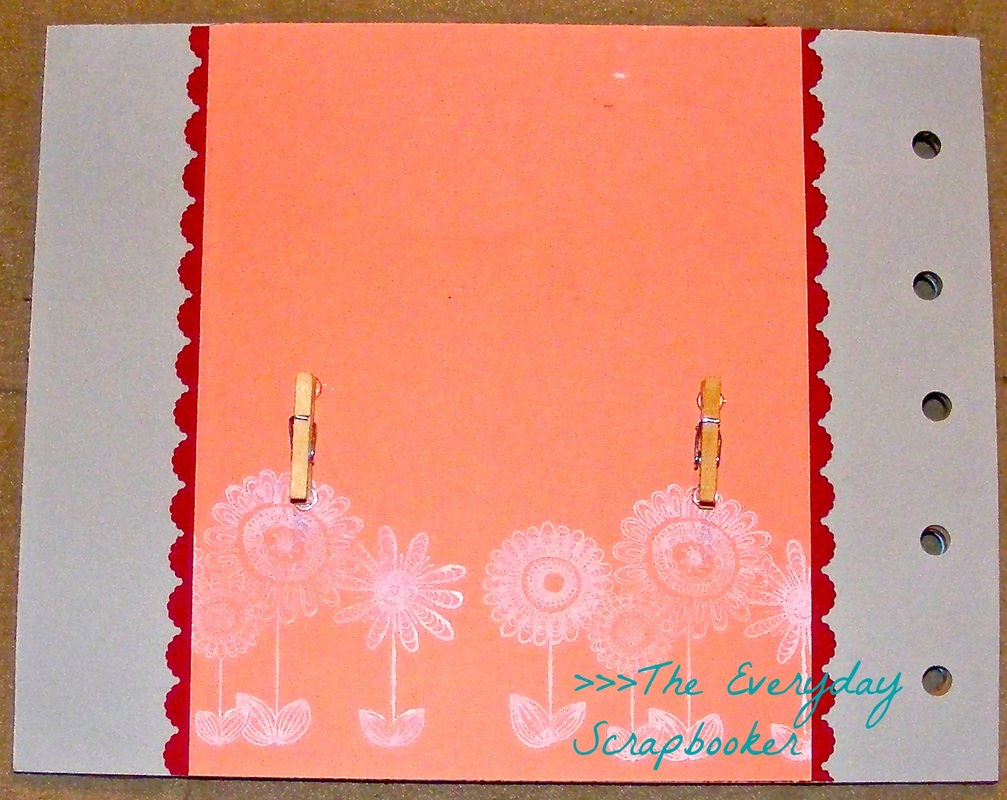
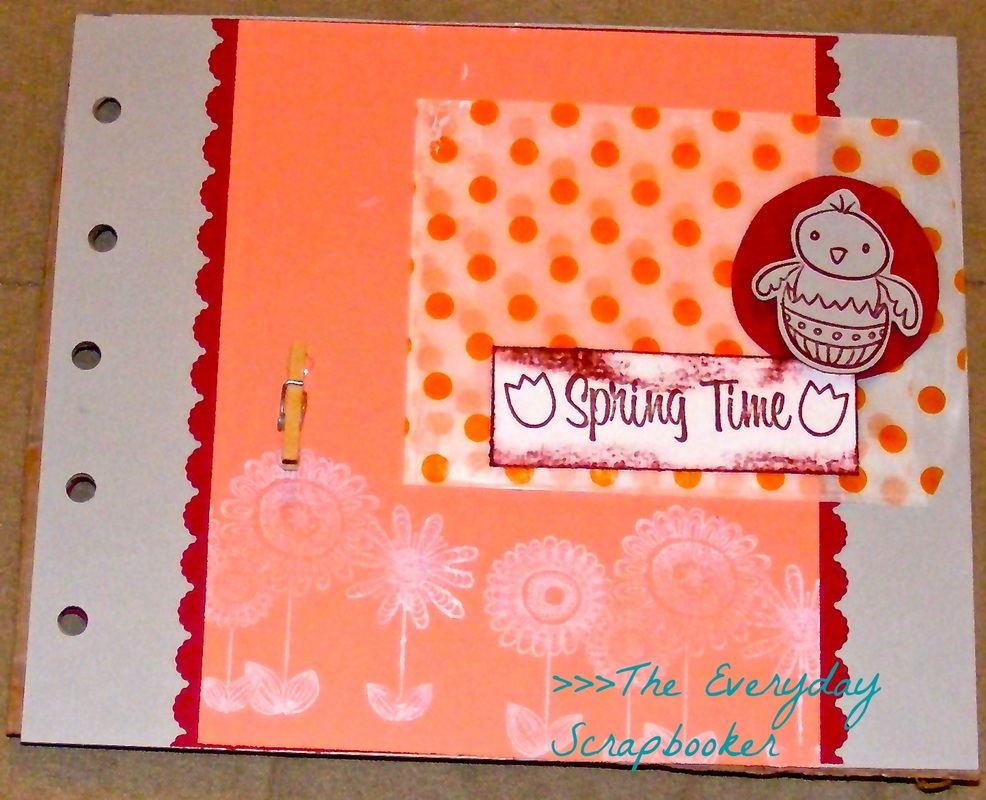
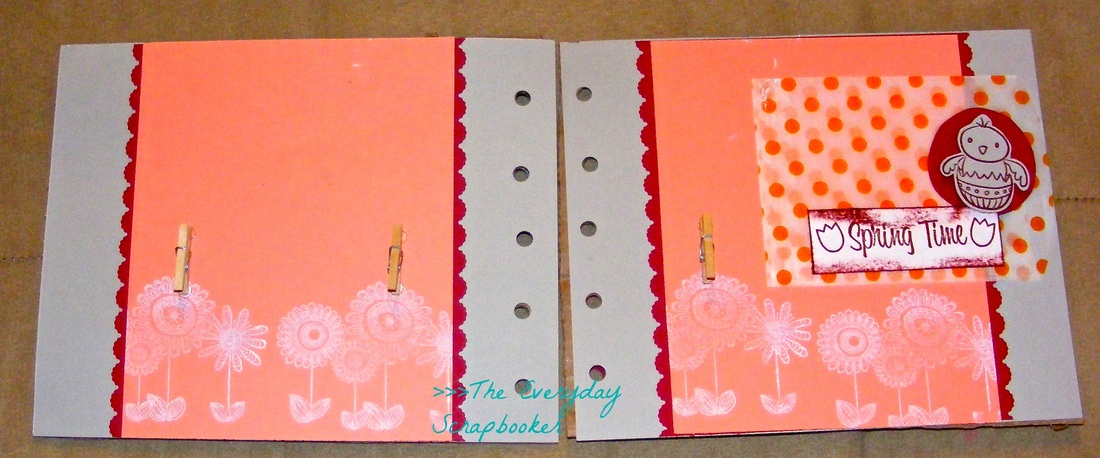
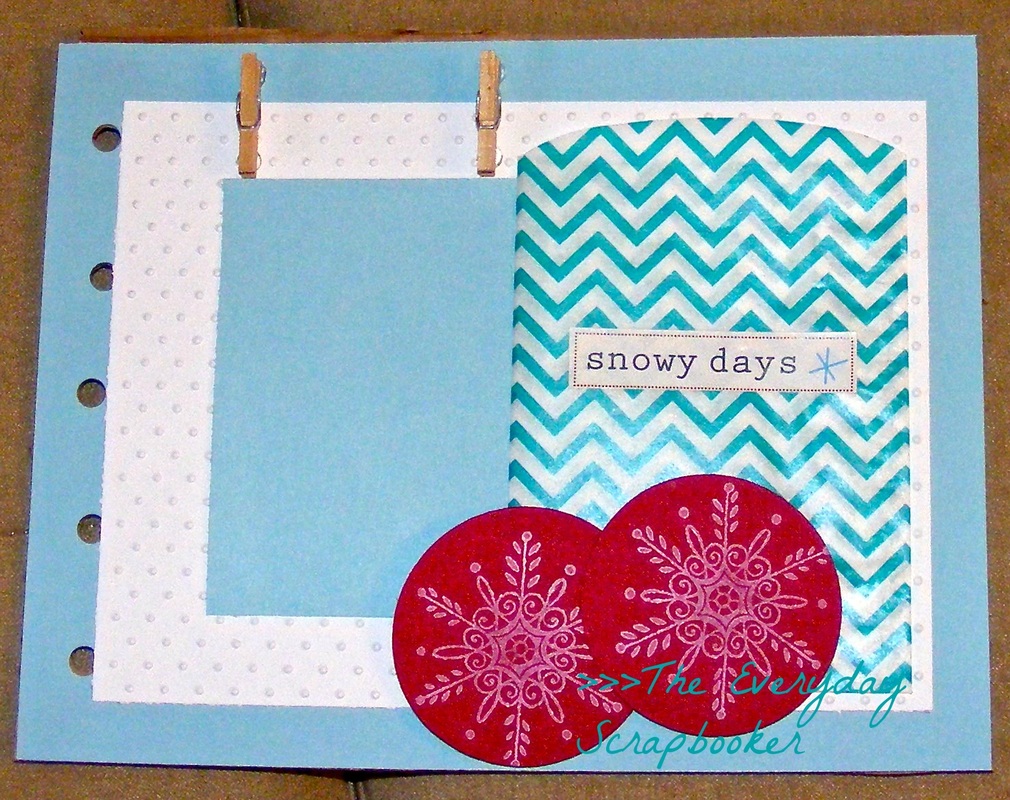
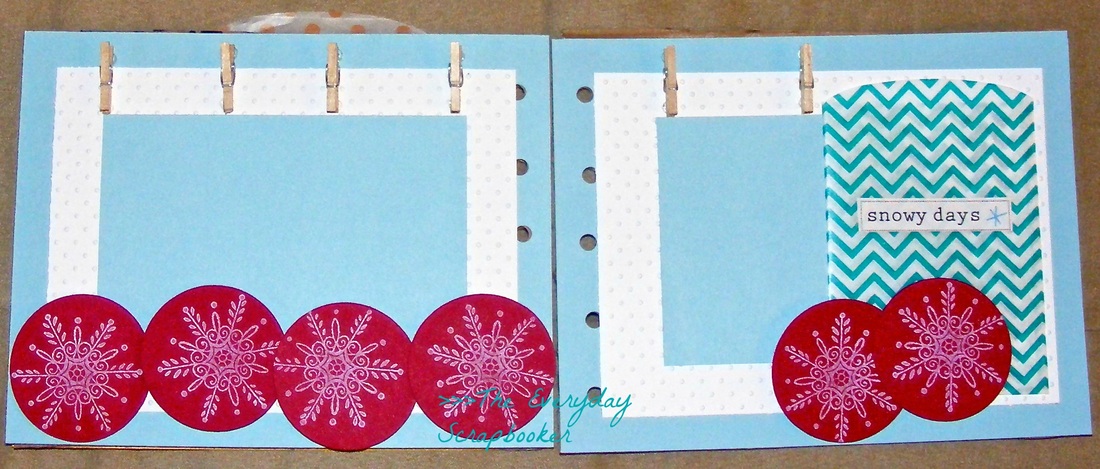
The ABC cards inspired the message centre that you see on the left side of the photo column. I didn't make it with anyone in mind- or anyone in particular- it just sort of came to be! I am open to selling it, if there is enough interest in purchasing it. $10.00 CAD, and its yours! Otherwise, I may give it to the girls' Pre-Kindergarten teacher when they start school. Just as a nice thought/gesture type of thing. I used mini clothespins to hold the paper in place. When she runs out of paper, she can easily add more! This can also be customized to anything you want- shopping list, notes, you name it, I'll get it done! 
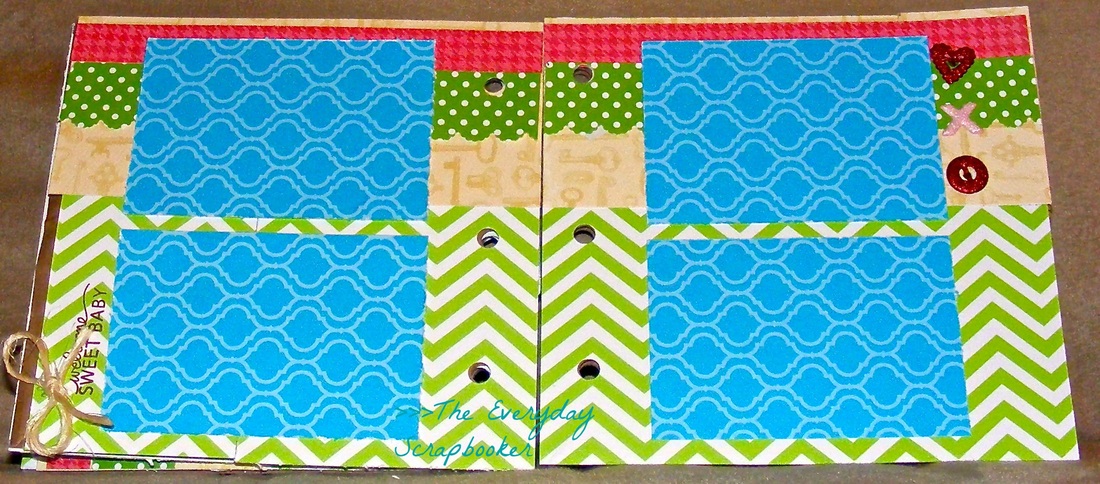
Pretty impressive for a day without kids, wouldn't you say?! The next three weeks are going to be a.ma.zing!!! (ALthough we'll be gone for another week in there, too). Coming up tomorrow, I'll be starting on a new mini album for a repeat customer. I'm pretty excited to be starting on it. Unfortunately, the wedding album I was so excited about, appears to have fallen through. But, no worries! I'm so happy to be working on this for my customer!
Goodnight, sweet dreams, and I'll catch up with everyone again tomorrow!
0 Comments
Hi everybody! WHen was the last time you received great news, that made you almost delirious with excitement? For me, it was today. This evening, as a matter of fact. My mom had phoned to let me know she sent me moolah (for the Christmas cards I made for her), and she went on to tell me that one of the ladies she works with is interested in having three mini albums made- one for each of her boys. I'm pretty stoked- that's going to be a large order! Phew! Lets hope it comes through! Ha. Now that I mentioned that, Murphy is going to sabotage my great news. (Wink, wink). In other news, my freedom (aka kidless days) has all to quickly come to an end. I'm going tomorrow afternoon to pick them up. Their grandma needs to run an errand on Thursday that's taking her all the way to Camrose, and we don't want the girls riding along with her. But, that's ok, because I'll be busy enough getting all our laundry done and re-packed for our next camping trip. So, just a friendly reminder that I'll be gone from Friday the 15th to Monday the 19th. You'll see me going gung-ho again when we return- the girls are going on another vacation- this time with their OTHER set of grandparents! They'll be gone an entire two weeks! I'll try and contain my excitement. Ahem. I'll be sooo sad while they're gone! We may- though that hasn't been confirmed yet- be going away again for a few days, just me and the hubby, but I'll let y'all know that for sure. If not, I'll definitely be away the first week of September. But, I'll remind you before then. My new customer and I are working closely together, trying to come up with ideas that will be perfect for her sisters' wedding album. I made this layout as a sample for her. We are trying to come up with ideas that tie French and country together, and this is what I came up with. My customer likes the idea of using blue, and she wants bits of red in there. The wedding colors are pink and green. So, even though there's no green in this layout, you will find more green in the rest of the album. The first thing that comes to mind when I think of France (romantic France) is toile. The recipient of this album was born in France, and so we're trying to brainstorm ideas that incorporate her heritage into a few of the pages within the album. After I thought some more about it, lace, doilies and florals also came to mind. THEN, I began wondering what the colors of France's flag is. I'm pretty sure its white, blue and red. Right? I better Google it. Ha. We both agreed that an ombre effect would be nice, so I stacked and layered strips of punched card stock, in varying shades of blue. It looks very lacey, doesn't it? There is enough room inside the photo mat for two 4x6 photos, or one 5x7 (horizontal) photo. My customer hasn't given me the yay or nay yet, but I have to say that I'm (personally) in love with this sample. If she decides she doesn't like it, this layout will be added to my RTS album (on my group page), and someone else can snatch it up! Next on the agenda is coming up with a theme for the groom in this album- who is through and through a country boy. I want to create another ombre effect background, but instead using yellows, greens and golds. I'm just not sure yet how I'm going to do it! Ha. I should do a John Deere theme- green and yellow! Its a thought... Remember THESE cards? I want to use the same stamp on the groom's layout. I'm just not sure how I'm going to do it yet! It looks a bit like wheat. Right? I think it does... Here's the next set of pages in our nieces' baby shower album! I switched up the blue photo mats with yellow ones this time. I think I might like the yellow better. I had originally cut out a bunch of photo mats using this yellow lattice paper, but I didn't like it. That's why you saw the blue in the previous pages. I pulled out the yellow again today, just to see how I felt about it, and I adore it! Why didn't I just stick with my gut feeling in the first place?! Oh well. Live and learn. As I mentioned last night, the next set of pages would house the border along the bottom portion of the pages, and as you can plainly see, they are definitely at the bottom of the pages! I added a few baby sentiment stamps to the bottom of the photo mats on the left page, and to the top right photo mats on the right page. I'm hesitant to add any kind of embellishments (or too many) because without the pictures, I'm not entirely sure where to put them! Also, I want the star of the album to be our nieces' baby. Too much will distract from the pictures. This album is coming quickly to a close. There's two pages left, and then the back cover of the album. Next on cue is the wedding album I'm eager to get started on! Has anyone else noticed that I've got babies on the brain lately?! Everything I'm making these days is all about babies! It must be due to the fact that I'm working on the baby album for our niece. It just occurred to me today, that I'm going baby crazy! While I was brainstorming ideas for the layout that you saw above, I came up with this idea. I cut multiple circles using my Cricut, then adhered them in sort of a mod/hodge podge sort of way. For a little extra dimension, I adhered them using pop dots. I found the sentiment stamp buried in my stash, and sadly, I don't think its ever been used! I plan on doing another set of cards using the same layout, but with a different theme. It originally was going to be a birthday theme; it may still be, or I might change it up. I might possibly go with another baby card, or a completely different sentiment all together. Not totally sure yet! It'll be a surprise for all of us! Oh shoot! Here we are coming into another Wednesday, which means Win it Wednesday is on our door step! Since I've got babies on the brain, tell me, how many children have you always wanted? How many children do you have? Our contest will run until Thursday morning at 8 am, upon which I'll draw the winner using Random.Org. This weeks' winner will win THIS card. Good luck, everyone! Well, my dear friends, that's all I've got for tonight. I hope you have a wonderful evening, and if there's severe weather in your area, I hope that it leaves you unscathed! According to the Weather Network, we are in for one doozy of a storm late tonight. We shall see. It feels really humid out there (even at this hour!!), so we shall see. I may not get very much sleep tonight. I am not a storm enthusiast by any means!
Anywho, take care, and I'll catch up with everyone again tomorrow. Hi everybody! If you saw it, I mentioned on the group page that I was going to be all alone all night, but as it turns out, my husband is already on his way home! He drove an hour and a half (half way to his destination), only to find out they no longer needed his services. He was sent out on a 'stuck and tow' mission. Basically, he was going to pull out another truck that got himself buried. Probably in mud. Since my husband drives the largest (and heaviest) truck in the fleet, he got nominated to go rescue the dude. Lucky guy. He's a bit peeved they waited until he was half way there to tell him they no longer needed him, but at least he's not coming home at some ungodly hour tonight- like 1 am tomorrow morning (or later). So, I'm going to quickly whip up this blog post, and then chill with him for the rest of the evening. I think we're planning an ice cream date. Speaking of ice cream, I've been searching and searching, for years and years, for peach passionfruit frozen yogurt. Its like heaven on earth. Well, I thought I found it yesterday at the grocery store. I nearly had a meltdown right in the frozen goods aisle, and then I realized it still isn't the right kind. But, its close enough. I am having a love affair with mango lately, so peach mango is close enough in my books. Who else loves mango??! With no kiddos tugging at my shirt tails every 30 seconds, I got a lot done today! Ha! To begin, I finally got Rosalyn's layout done today. I found stickers that would work well to highlight a digger/CAT heavy machinery themed layout. Here it is! I really wanted to incorporate the CAT logo into the layout, but for the life of me, I could NOT figure out how to replicate the logo multiple times on my computer. I managed to get it printed out three times on a single sheet, but the font was way too large. Then, the problem became trying to figure out how to make it smaller! I eventually scrapped that idea, and typed out the word 'caterpillar' multiple times, and cut and pasted it until I had filled a page. Once it printed, the margins were way off, so I needed to figure out a way to make it work with my spread. I came up with the idea of using the arrows that you see bordering the 4x6 photo, to mimic the arrow that you find in the logo. I cut out one of the three caterpillar logo's and used it to create a border three quarters of the way down the page, and layered a caution sign on top of it for a little extra oomph. I stuck with CAT colors, as you can plainly see. I think the whole thing screams CAT. Yes?? Remember the baby cards I made YESTERDAY? I mentioned that I wanted to create more cards, but with a boy-ish twist? Here they are! I realize they can be for just about any occasion, but I originally intended them for a baby boy. I love the teal and orange combo. Its a fun twist! Lastly, I got four pages in the baby shower mini album I'm working on, done this afternoon. Phew! Since the brown paper bags are folded in half, when you get to the middle portions of each bag, it isn't as easy to take a picture of each page separately. I could have snapped separate pictures of the pages on the right, but decided to keep it all the same this time around, so there's no confusion. Mainly, so I'M not confused. Ha! I liked the froggy stamp so much, that I had to use it in the mini album, too. Instead of including the sentiment, I only inked the frog portion, then inked the edges of the circle I centred it onto. I used some pop dots to make it stand out a little more. (Those are pages 2-3). Pages 4-5 are flipped, if you noticed. Instead of adhering the border to the outside left and right sides of the pages, instead I adhered it to the top portion of these pages. On pages 6-7, you'll find the border along the bottom only, and pages 8-9 will be on the outside left and right edges again. Make sense? It'll keep following that pattern until the album is completed. The back cover will look similar to the front cover. I stamped a sentiment on the bottom right page (4), then added brads to the top right portion of page 5. For an additional twist, you may also find that the color scheme will change midway through the album. Just trying to keep y'all on your toes!! In other news, I'll be working on a wedding scrapbook album once this baby album is completed. So, keep your eyes peeled for that. My customer has requested that pictures remain anonymous, so I'll only be providing sneak peeks again, once the album is under way. I can't wait. I'm delirious with excitement!!
Enjoy your evening, peeps, and I'll be back again tomorrow, with more wonderful goodies! Hi everybody! How was your Sunday? Ours was pretty relaxing, but fun. I got to ride shotgun with Kyle for a bit this afternoon; he was called into work to stack some mats for a job tomorrow, and I got to accompany him. When we got back to the yard, he took a loader, crumpled up a barbecue that we've been wanting to dispose of for a while, and then threw (or, dropped) it into the trash. I posted a video to my Facebook; you'll find it HERE. It'll be the most recent post on my personal Facebook. After that, we did a bit of grocery shopping, I hit the Dollar Store (and found the perfect item I was looking for!!), and made it home just as a thunderstorm blew into our area. I got a few projects done today, including one that's a surprise. I can't show you the entire project, but I can (I think), show you a sneak peek! I can tell you its my first design team assignment for Simple Sketches. Eek! In addition to that, I finished the title page of our nieces' baby shower mini album, and I made some baby themed greeting cards! It was a wonderful day. I am in.love. with the title page of this mini album! I began putting it together yesterday, but only got the base adhered to the brown paper bag (the green chevron patterned paper, and the yellow, green polka dot and red strips layered on top of it). I wasn't quite sure what sort of sentiment or embellishment I was going to use, until I came across the elephant in the Sugar and Spice Cricut cartridge. I thought it would work perfectly for an album that'll be dedicated to a sweet little boy. I began by cutting out the scalloped circle (3.5 inches), using my Cricut, and the same cartridge that I mentioned above, then cut out the inset circle (4 inches) using my Cricut, as well. For some extra dimension, I used pop dots to adhere the elephant, and used my brad setter to make a hole and insert the star brad for an eye. Lastly, I stamped the title with Cherry Cobbler ink (SU), and added a bow at the top of the page to complete the title page. I've been dying to use this umbrella stamp, and wasn't sure how I was going to go about that, until I came across THIS sketch. I love the simplicity of this sketch, and the white space it lends, keeping the eye right on the focal point of the card, which happens to be the embellishment and sentiment. Rather than using a flower, I thought the umbrella would be perfect for a baby card, though I realize that it doesn't make a very good 'boy' card. I might cut out more elephants, like the one above, and create more for baby boys. Or a little ducky, since I've got an image for that on one of my Cricut cartridges, too. Maybe a moon and stars...there's lots of possibilities! Once again, it was very simple and very easy to make. And, how much do you love the yellow polka dot patterned paper?! I'm smitten! Once again, we've rolled around to Mojo Monday. Since today's post has been mostly about baby's, my challenge to you is to create something that's baby inspired, or geared towards a little baby. Use my projects as inspiration, or find something else online (or elsewhere) that inspires you! Be creative, and when you're done, link up your project to the blog here, or to my group page. I'd love to see how you've been inspired!
Take care, everyone, and I'll see you all again tomorrow! Hi everybody! All I've got to share tonight is the set of cards I whipped up this morning. I had hoped to sit down and play some more tonight, after dropping the kids off at their grandparents, but instead, I kicked it up a notch, and got the house all shiny and clean (with my dear husbands' help, of course!), then we sat down to watch the next instalment of AGT. For those of you that are current on this show- I don't know if its over yet or not, but my money is on Kenichi (Kenny G, because that's what his name sounds like to me). Mr. Dance-ish. I saw him in an episode of Angelina Ballerina. I think he won. But, that's just my humble opinion.
I really want to get to work on the layout I'm making for this past weeks' Win it Wednesday challenge, but I'm looking for a special element, and I'm coming up short. So far. I want to hit the Dollar Store, and see if they have what I'm looking for. I don't have the item I want on any of my Cricut cartridges, and Walmart doesn't have what I'm looking for. Its a surprise, if you can't tell. Ha. So, keep your virtual fingers crossed that the Dollar Store does! I tried popping over there after coming home tonight, but of course, the store was closed already. Boo. Tomorrow's the day! So, the halloween cards I made today. They are uber simple. I followed THIS sketch, but rather than adding a sentiment that spans the height of the card, I opted out of it, just leaving the embellishments that you see on the right-hand side of the card. And, rather than clustering them together, I spread them out, and chose to use a circular pattern rather than square. That part was easy- I just cut out the circles from the pieces of patterned paper I wasn't planning to use, and let it do the work for me! I also traced three more circles, so that I could add one more graphic (the skull and crossbones). The circles are adhered with pop dots. Easy peasy lemon squeezy! Enjoy the rest of your evening, and I'll catch up with everyone again sometime tomorrow! Hi everyone! I have the best friends and fans out there! Thank you for sharing your concern over the post I made last night on my group page. I'll spare you all the details, but just suffice it to say, its going to be a long road to recovery, but we've made a start. And, that's the main thing! There's a bit of housekeeping to get out of the way before I share with you what I did today. First and foremost, a dear friend of mine added me to a group this afternoon, that's near and dear to my heart. Normally, being added to a group isn't such a big deal, but this one is for such a worthwhile and deserving cause. My friends' cousin has been diagnosed with an incurable form of cancer, and a fundraiser has been set up in her name. Vendors- and shoppers alike- are invited and encouraged to share their goods, and raise some money for an incredibly charitable cause. My family has been touched by cancer, which is why I've donated a few of my items for auction. If you or your family has been touched and affected by cancer, won't you do the same? All proceeds from the sales goes to the fund for my friends' cousin, to help pay for medical expenses while she gets treatment. Your thoughtfulness will go a long way! You'll find the link to the group page on my group page, but you can also find it HERE. Secondly, the Work At Home Moms group that I am a part of is undergoing some changes- good ones, I might add! The new group page hasn't been unveiled yet, but in the meantime, we're trying to spread the word that as part of the unveiling 'celebrations', there'll be a fun Scavenger Hunt to participate in. Until that's officially announced, check out the vendors that are participating, like their pages, and spread the word! We'd love for you to join! Once again, the link can be found on my group page. Now for the good stuff! I finally completed the cardboard mini album I've been working on. I love how it turned out! The last two pages are Spring/Easter themed. After a lot of playing around, and adhering paper, and then tearing it out (ha), I ended up with this. I used SU's Whisper White ink to stamp the floral design along the bottom edge of the orange card stock, and used a scallop border punch to create the scalloped edge on either side of the orange paper. Same is true for the next page; the only difference is, the envelope for extras was added, along with some minor embellishments. The last two pictures show the cover pages for the album- the first is the back cover. The journalling card with the little banners stapled to it are for any notes or journalling my customer would like to add; also, you don't see it in the picture, but I added a business to the back page as well, but its hidden! It also has a small banner stapled to it, and can be pulled out so if anyone wants to know who made this, all the information is there! (By the way, the main journalling card with banners stapled to it is also removable). All the patterned papers and card stock on the back cover are scraps from other projects. Finally, I snapped another shot of the cover page (title page) so that everyone can see how it looks bound! I used twine to tie the album together, tying it into several knots to make sure it doesn't come undone. **Sigh** I hope my customer likes it! Next on the agenda is working on a special layout for this past weeks' Win it Wednesday winner, and also a baby shower mini album for our niece.
I mentioned on my group page- and asked a question- that I would be starting a new mini album, and I asked who could guess what this album is going to be made from. Since no one answered (it probably got buried, so no worries!!), I'll answer it for you! Paper bags! I'm pretty excited about starting this project. I'm planning to make it basically like a 'brag book', so that our niece can add pictures to it, and gush about her sweet soon-to-be-born-baby boy. Thanksgiving and the start of school is coming up soon. If anyone is looking for anything holiday or school starting related, talk to me! Thanks for dropping in, and I'll see everyone again tomorrow! Hi everyone! Oh, boy, do I have bucket loads to share with you tonight! I'm pretty excited about it! So, since its fairly picture heavy, I'll get right to it. In a minute. First, I just want to remind everyone that the Win it Wednesday is still open- you've got lots of time to get your vote/comment in to win a fabulous prize! Leave your comment HERE or HERE to be eligible. Contest closes at 8 am tomorrow morning! Good luck! I completed the order for a dozen Christmas cards for my mom today. If anyone wondered what they look like all together, here's a shot for you! So, as you can plainly see, they are essentially the same, except the sentiment and main embellishment is different. And, I just realized I forgot to snap a picture of the inside of the cards for you. I'll get on that tomorrow, hopefully! I have also gotten into the habit of stamping the outside of the envelope, too, with the same image as whatever is on the card, just to tie the whole kit and kaboodle together. I like to think it gives the envelope a little more class (and its a bit more interesting to look at, too!) Hopefully my mom likes them! Before I finished the order that I showed you above, I got to working on the next two pages in the mini album I've been working on. This leaves me with only three pages left! Eeek! Its coming to a close way too quickly! There'll only be one more two page spread left, and then the last page (title) cover. What will I do next?! The layout for this spread was inspired by THIS set of cards. I wanted to incorporate snowflakes into the layout to highlight a winter/Christmas theme. I wanted the spread to work either way. I didn't want to use anything too Santa-like or holiday-like, just in case the photos displayed on this page aren't Christmas-y at all. If they are, then the theme behind it will still support the photos. But, I was afraid that stamping the snowflakes directly onto the layout would get lost in translation- especially after photos are added, so that's where the blue cards above come in. I like how the snowflakes looked stamped onto circles, so I repeated that idea here. But instead, I used cranberry card stock instead of light blue. I love the red/blue color combo, anyways. Also, instead of incorporating so much layering, I kept the layers to a minimum, and dry embossed the white card stock using my Cuttlebug. It also kind of mimics the idea of snow, and I like that! When I reached the second page, I quickly realized that orange would not work with the color scheme I had chosen for this spread. I am sooo thankful that I picked up the vellum envelopes in teal, too! It fits the theme so much better! I finally put one of the new stamps that I won to use! I had stamped the image before, in a lime green, but I wasn't feeling it (I had originally planned to use it on one of the cards I was making for my mom). I thought I'd attempt it again- using different ink, and stamping the image in the centre of a circle (once again). I cut the circles with my Cricut (3.75"), then stamped the image using Ruby Red (SU) ink. The base of the cards were created using Recollections Chevron patterned paper, and I used up what was left of the cranberry card stock from the spread that you saw above. For a little more interest, I also added some ribbon and a bow, securing it underneath the stamped wreath with some glue dots. Each of the ribbons is different, as I ran out of the ribbon you see in the first card! The circles were adhered with pop dots for a little more dimension. I scrap lifted a card for this set of cards, which you'll find HERE. You'll see that the basic skeleton is there, but I tweaked it to work with what I wanted. I actually think I like it a lot better than the card I scrap lifted! Thank you all for dropping in and visiting with me tonight! I'll catch up with you again tomorrow!
Hi everyone! I'm baaaaaccckkkkkkkk! How was your long weekend? Did you do anything fun, and did you take advantage of the gorgeous weather we had all weekend long? We left in perfect time- not long after we hit the highway after leaving the Brazeau Dam, it began raining. There was some rain overnight Saturday night, and into the early morning hours of Sunday, but otherwise, the weather was perfect! We also had that thunderstorm roll through Sunday night, if any of you caught that on my page status, and on Instagram. I'm not sure if I've told everyone or not! I am now on Instagram, so if you have an account, and want someone else to follow, look me up! Search AMKrogsgaard. You'll find me there!! It began as my personal account, though I never posted anything publicly, and then after I was inspired by another WAHM, I changed the settings, and it became my personal/business account! Drop by, share some love, and say hi! I love visitors! I don't have much to share today, contrary to what I was hoping. You know, that darn America's Got Talent. Kyle turned it on as soon as the kids were in bed, and I just wasn't able to get off the couch! I was glued to that tv screen like tape sticks to paper! I do, however, have a couple cards to share with you. I stole a few minutes this afternoon, to make another sample card for the batch my mom ordered, and I whipped up a card quickly last night, for an order that came in while I was away over the weekend. If I can get my act together tomorrow, I'll set aside more time for playing. Today was devoted to catching up- meaning getting the mountains of dirty laundry washed, and ready to go for the next camping trip, which is happening on the 15th of this month. Just a little forewarning! But, I'll remind y'all again when we plan to be away. Keep those orders coming in, and keep spreading the word that there's a girl here who would love to create things for the community at large! The first card, a baby shower card, was made for another WAHM that I've recently 'met'. I'm honored she thought of me, and I'm honored that she'd rather have something hand made than something store bought. She requested that the card be in pink and greens, with flowers and/or butterflies. She had made something for the lucky baby in pinks and greens as well. Here is what I came up with: The quality of this picture is horrible. If you can, please try and overlook that!! My camera was out of commission last night and all day today (first- no camera- it was locked in the console of my husbands pick up; and secondly, it is in dire need of new batteries!!), so I used my cell phone last night to snap a picture. It really, personally irks me when pictures aren't perfect, because I feel it reflects badly on my product. I will post a brighter, better quality picture in the very near future! Keep your eyes peeled for it! I used Recollections' Primary Pin Dot (polka dot) patterned paper, as well as pink and white card stock (also Recollections), and layered them like crazy. The top rectangle I punched only two corners with the corner rounder- kitty corner to each other- for a little more drama. I spritzed the oval Martha Stewart Tag with Sour Apple Pearl Mist, and popped a butterfly on top (which is also pink). I don't know anymore where the butterflies came from. Probably K&Co. Lastly, the ribbon is miscellaneous. For a bit more emphasis, I added pop dots to the top pink panel, just to raise it up a bit more. The order I'm working on for my mom is a larger one. She asked for a dozen cards, and rather than making them all the exact same, I am splitting them up, so that half of them look like the one above, and the other half look like the one below. Both sets of cards share the same basic design, but the main embellishment is different. She didn't want anything with Santa Claus on it, so I opted for an ornament stamp, and a snowflake stamp, that's centred on a circle that I cut with my Cricut (and adhered using a pop dot). I inked the edge of the circle with Tropical Blue ink (Rubber Stampede- Michaels), and stamped the sentiment using the same color ink. Also, I switched from using green Primary Pin Dot patterned paper (Recollections), to blue. Also, I haven't gotten a shot of the inside of the card (the green and red one); I'll get that up in tomorrow's blog post. There's a little surprise involved, and I think I might start doing it more often. I don't often stamp the inside of my cards, but I like the added touch it lends. So, expect more of it!
Tomorrow is once again Win it Wednesday! And, since we just celebrated a long weekend, and some people took advantage of it by getting away for a couple of days, I'd like to know: What is your dream vacation? The winner of this weeks' Win it Wednesday is going to take home a custom made layout! All thats required is a photo (of your choice!), and I'll whip it up for you, and then get it shipped off to you! You even get to decide what size you'd like it in! (6x6, 8x8, 8.5x8.5, 8.5x11, 12x12, or any size in between!) Those are a lot of options! So, get your answers in- please, only one 'vote' per person. The contest is open as of now, until 8 am Thursday morning. I'll use Random.Org to draw the winner after that! You can either vote by way of commenting on this blog post, or join me over on my group page, and answer the random question there! I love you all, thanks for dropping in, and I'll catch up with you again real soon! Hi everyone! Just a quick quickie tonight--I was working on cards for my mom again- just trimming my card stock to size, and figuring out a design. I got this entire card made, and then discovered that I'd made one too many! So, this one is an oops, but totally benefits you! This card will be found in my SALE! album, over on my group page, and has been discounted, since there'll only be one of this card. Its $3.50, and shipping will be included if you live in Canada. I will ship to the United States, but the price of regular postage will be added to the total. That's still a pretty good deal, considering the cards that you find in stores like Hallmark are $5.00 or more! And, this one is custom- there won't be another one like it! (Unless you ask for more, heh).
Both the card stock and green patterned paper is Recollections...as a matter of fact, all the paper here is Recollections. I stamped the ornament then fussy cut it, and adhered it using a pop dot. Then, I tied some left over white ribbon, and adhered it to the ornament with a small glue dot for a little extra bling. The ornament and sentiment stamps are both SU, as are the inks that I used (Bravo Burgundy and Basic Black). Notice how there's no mention of a sketch that was used???! Just sayin'. I'm still trying to reach my goal of 200 fans- spread the word, and encourage your friends and fellow scrappers to check my page out and 'like' it while they're there. The more the merrier! Also, one lucky fan will win a set of cards once the 200 fan mark is met! Also, I've got something sneaky up my sleeve, but I'm not going to divulge all the details just yet. All I'll tell you is that I was inspired this morning by a toilet paper roll. I'll leave the rest up to your imaginations for now. I'll also let you know that in addition to my early morning inspiration, I'm collaborating with a fellow WAHM on something extra special. It may or may not be related to the toilet paper rolls. Just sayin'. Heh. The lucky winner of our Win it Wednesday challenge is Athena Forbes! I've already been in tou Tomorrow we are off for the wild blue yonder, so you'll likely not see me until Monday night or Tuesday night. I don't know yet when we plan to return. I will try to drop in to my group page here and there, of course, pending service. For all my Canadian friends, enjoy your weekend, and stay safe! Peace out Hi everybody! I can FINALLY share the news I wanted to earlier this week, but wasn't able to! I had showed everyone a layout that I made a long time ago, but didn't want to share, because I had applied to participate on a design team. When the design team was announced, then I felt ok sharing what I had created with everyone. (The post I'm referring to can be found HERE.) The design team was revealed today, which means I can finally share the news I've been trying to hold in for the last week! I made the design team! You'll find the announcement HERE. So, that means I'll be able to get my own scrapbooking in in-between all the great products that I'm making for all of you- my fans! I'm pretty excited about it. I've known Melissa, the girl that created this design team, for a while now. Although we've never met in person, I do know she has a natural talent for creating beautiful, easy to follow (and interpret) sketches, and I'm honoured she chose me to be a part of her team. Wonderful things will follow! In other news, I will be away starting tomorrow (possibly) or Friday through to Monday. You probably won't see me until Tuesday. To all my Canadian friends- enjoy your long weekend! What have you got planned? Every August long weekend, Kyle and his step family go camping together. We call it a family reunion, but that's not really accurate. Its close, though, because we only tend to see each other at Christmas and in August. I hope the weather cooperates for us! I will be dropping in from time to time to say hi and make sure everyone is behaving! Ha! In the mean time, I've got goodies to share with you! To begin, is the sample card I made for my mom. I'm so glad I made a sample, because it turns out she doesn't like cards with Santa on it. I was hoping the vintage style would be ok, but I suppose not. But, that means YOU'RE in luck! If you like this card, and want to make it your own, please send me a message. I've added this card to my SALE! album on my group page. Its yours for $3.00. If you'd like more, I can make more, too! This card was very simple to make. First, I stamped the Santa image, then trimmed it to size, and used my corner rounder to round two of the edges of the white card stock. Then, I trimmed some green polka dot patterned paper (Recollections), and adhered it to the opposite side of the rounded corners. I inked the edges of the white card stock to give it a more bold edge (using SU's Basic Black ink), and stamped the sentiment on burgundy card stock, and trimmed it into the banner shape. I adhered it using pop dots. This card was made using a sketch, once again. You'll find it HERE. I realized, after punching out the tag that you see on this card (from the Kraft card stock), how much it looks like a headstone! And, it works perfectly for the theme of these cards. Like it was meant to be! I seriously hadn't originally planned on it, but it works! I LOVE it when a plan comes together! Haha! I used my Cricut to cut out a few circles in varying sizes (2 inches and 1.75 inches), then stamped the halloween sentiment onto the smaller circle. I also inked the edges of the smaller circle, using SU's Basic Black ink, just to help distinguish between the two circles, since they're both cut from the same orange card stock. I used a bit of washi tape for an accent, which is layered underneath the sentiment, and punched scraps of patterned paper for a little more bling. Once again, a sketch helped this set of cards come to life. You'll find it HERE. And lastly, the next few pages in the mini album I'm working on. The theme for this one began with Fall, and what sorts of things are associated with it. After thinking of Thanksgiving and Halloween, I decided that the bigger part of the autumn season is the beginning of school. Thanksgiving and Halloween are only one day; school lasts the entire year. So, when I think of school, school busses come to mind. I tried making this page look like a school bus- at least- picking up the black and yellow color scheme that most (if not all) school busses sport. I trimmed strips of black card stock in varying widths, and adhered them in a small-big-small pattern on both ends of the pages, then I added some patterned paper (slightly larger than 4x6) to mat the photos my client will add when she receives her happy mail! in the mail. I cut a stop sign with my cricut from another sheet of patterned paper, then added 'STOP' with black alphas (Echo Park). I inked the stop sign with Basic Black ink (SU), for a bit of a finished edge. And, of course, I added another envelope, so that my client can add whatever memorabilia she'd like (though it will now allow storage of a 4x6 photo).
Getting our next monthly sketch up keeps slipping my mind, so I'll shoot for next week to post it to So, that's all I've got for you tonight. You may see me again throughout the day tomorrow; I don't quite know yet when my husband plans on leaving for camping. He was supposed to be working tomorrow, but his job has since been cancelled. So, tomorrow is going to be full of last minute cleaning, finishing of laundry, and packing! We'll probably need to fit some grocery shopping in there somewhere, too. Stay safe, stay cool, and enjoy your long weekend! We'll meet up here again sometime next week for our next group huddle! Thanks for hanging with me. I appreciate you all! |